http://billauer.co.il/ipmasq-html.html
The liberal way:
1 Talk’s outline
- iptables versus ipchains
- The goal (or: my goal)
- The packet’s way through iptables
- “Classic” masquerading (SNAT)
- DNS faking (with DNAT)
- Other things
- Firewalling with iptables (If we have time)
- Questions I’ll hopefully answer
Not covered: packet mangling (change TOS, TTL and flags)
2 Differences between iptables and ipchains
- Same author (Rusty Russell), and basically smells the same
- Most important: FORWARD taken apart from INPUT and OUTPUT
- Changes in syntax
- Masqurading is handled “separately”
3 ipchains and iptables don’t live together
- If the ipchains module is resident in the kernel, iptables won’t insmod
- And vice versa
- Typical error message is misleading: “No kernel support”
- Red Hat 7.3 boots up with ipchains as default
4 What I wanted in the first place
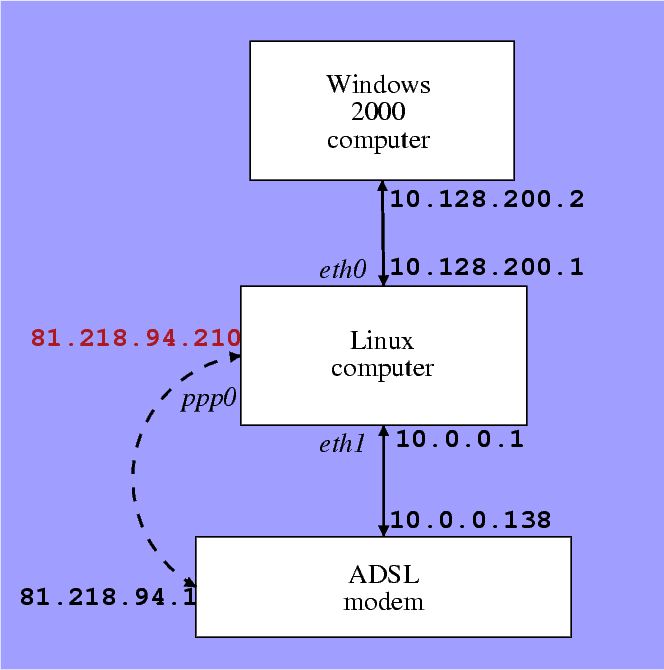
5 Requirements
- Windows computer should have a gateway
- DNS issue solved elegantly
- Both computers have access to network at the same time
- Network between computers is trustful
- Proper firewalling
- ADSL modem is considered hostile
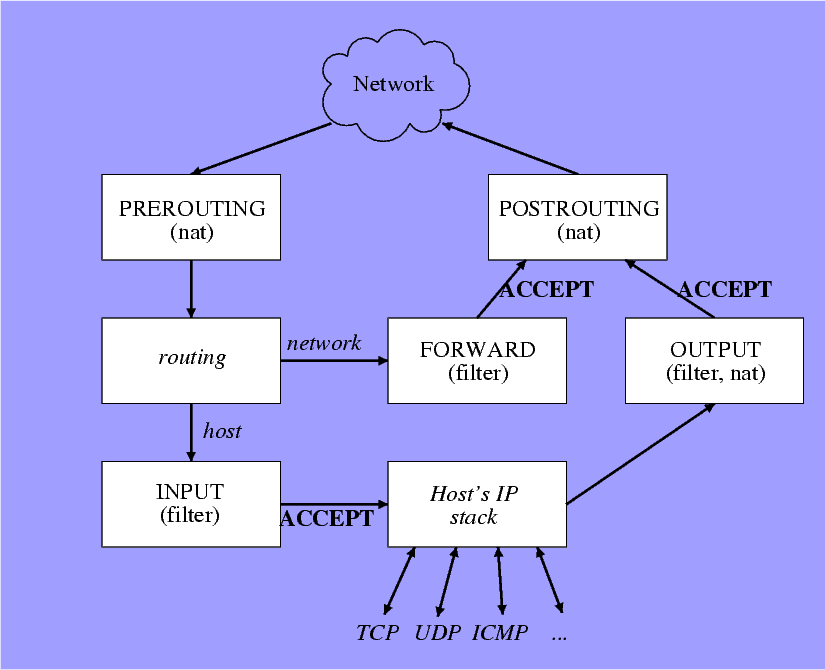
6 iptables: The IP packet’s flow
7 iptables: How to swallow this
- Packet filtering (firewalls) and manipulation (masquerading) are neighbours
- Therefore, the same tools are used
- Think routing tables
- Chains: Think subroutines
- Each chain is terminated with a target, or next line taken
- Subchains work exactly like subroutines
- Tables: Group of chains: filter and nat
- Each chain has a policy - the default target
8 What is Masquerading?
- All computers appear to have the same IP
- This is done with Network Adress Translation
- It’s easy to fake the “outgoing packet”
- “Incoming packets” must be translated too
- Port translation - a must
9 iptables: The IP packet’s flow
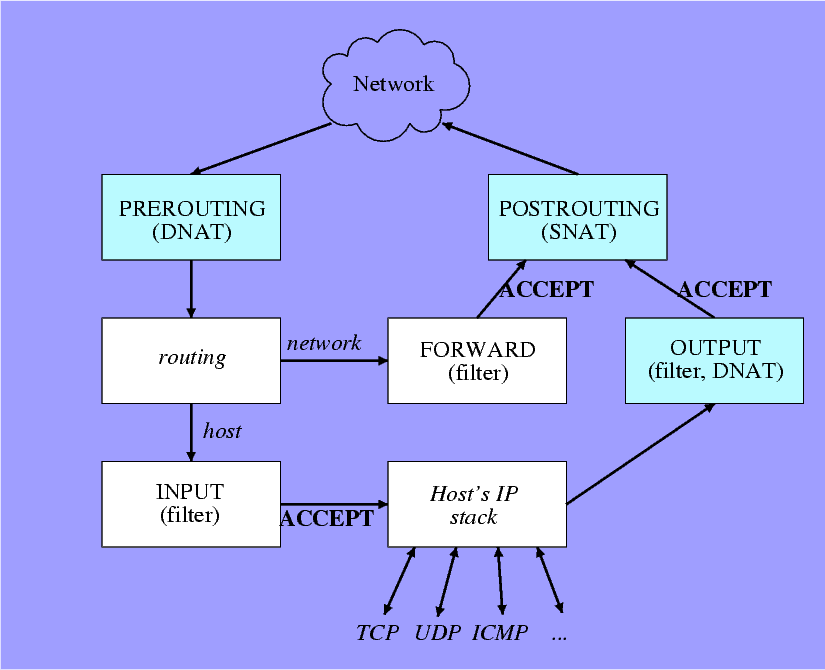
10 Source Network Address Translation (SNAT)
- On ADSL: catch packets going out on ppp0
- The source IP is changed
- Source port numbers may be changed
- Easiest rule: Do SNAT on all packets going out on ppp0
- Will include OUTPUT packets by accident, but who cares?
- Remember: Every SNAT produces an implicit DNAT
- And vice versa
11 “Incoming” packets
- The problem: Where should the packet go?
- Simple TCP connection: iptables remembers the port numbers
- UDP: Tricky
- DNS: Return the answer to whoever asked
- ICMP: Ping answers go the right way (!)
- FTP, ICQ and friends: Requires special treatment (they work for me as a basic client)
- When the other side opens a connection, that has to be treated specially
- iptables has application-based modules
12 Defining SNAT iptables commands
The strict way:
| iptables -t nat -A POSTROUTING -o ppp0 -j SNAT \ --to $PPPIP |
| iptables -t nat -A POSTROUTING -o ppp0 -j MASQUERADE |
- The “liberal” form is better for temporary connections:
- MASQUERADE automatically chooses address
- MASQUERADE forgets old connections when interface goes down
- For dial-up, cable modems and ADSL: MASQUERADE wins
13 POSTROUTE is just another chain
- Selective rules can be used
- Different manipulations are possible
- Use -j ACCEPT to let the packet through untouched
14 The wrong way to masquerade
iptables -t nat -A POSTROUTING -j MASQUERADE
- This makes masquerading the default policy for any outgoing packet
- ... including any forwarded packet.
- All forwarded packets will appear to come from the masquerading host.
- May confuse firewalls
- Even worse, may confuse service applications to compromise security
15 Masquerading and firewalling
- The internal computers are implicitly firewalled
- The main computer gets all the unrelated packets
- Main computer must be protected
- Main computer protected with INPUT and OUTPUT chains
- Other computers protected with FORWARD chains
- Note that FORWARD chains also apply to the intranet connection
16 DNS faking with DNAT
- The other computers have constant DNS addresses
- The address is translated with DNAT
| iptables -t nat -A PREROUTING -d 10.2.0.1 \ -j DNAT --to-destination 192.115.106.31 iptables -t nat -A PREROUTING -d 10.2.0.2 \ -j DNAT --to-destination 192.115.106.35 |
17 Automatic DNS DNAT setup
- In an ADSL connection, the DNS addresses are given on connection
- An ip-up.local script writes these addresses in the resolv.conf file
| DNScount=1 for nameserver in \ `perl -nle "/nameserver\D*(\d*\.\d*\.\d*\.\d*)/i && \ (\\$1=~/^127/ || print \\$1)" /etc/resolv.conf`; do iptables -t nat -A PREROUTING -d 10.2.0.$DNScount \ -j DNAT --to-destination $nameserver let DNScount=DNScount+1; done; |
- The perl statement above extracts the two addresses
18 The MTU on the Windows computer
- ADSL ppp connection has MTU of 1452
- Normal Ethernet has MTU 1500
- Windows computer doesn’t know it goes through ADSL
- Fragmentation
- Fixed by adding an entry in Window’s registry
19 Other tricks
- Server on masqueraded host (DNAT)
- Port remapping (redirection)
- Load balancing (One-to-many forward DNAT)
- Packet mangling
20 The filter chains
- INPUT, OUTPUT and FORWARD
- Targets with ACCEPT, DROP, REJECT or QUEUE
- A set of selective rules makes a firewall
21 Example: A firewall
Close everything and flush chains
| iptables -P INPUT DROP iptables -P OUTPUT DROP iptables -P FORWARD DROP iptables -F -t nat iptables -F -t filter iptables -X |
22 Example: A firewall (cont.)
Allow everything on loopback interface
| iptables -A INPUT -i lo -j ACCEPT iptables -A OUTPUT -o lo -j ACCEPT |
23 Example: A firewall (cont.)
Keep ADSL modem short
| iptables -A INPUT -i eth1 -s 10.0.0.138/32 \ -d 10.0.0.0/8 -p tcp \ --sport 1723 -m state \ --state ESTABLISHED,RELATED -j ACCEPT iptables -A INPUT -i eth1 -s 10.0.0.138/32 \ -d 10.0.0.0/8 -p gre -j ACCEPT iptables -A INPUT -i eth1 -j DROP iptables -A OUTPUT -o eth1 -s 10.0.0.0/8 \ -d 10.0.0.138/32 -p tcp --dport 1723 \ -j ACCEPT iptables -A OUTPUT -o eth1 -s 10.0.0.0/8 \ -d 10.0.0.138/32 -p gre -j ACCEPT iptables -A OUTPUT -o eth1 -j DROP |
24 Example: A firewall (cont.)
Linux computer with network rules:
| iptables -A OUTPUT -o ppp0 -s $PPPIP -j ACCEPT iptables -A INPUT -s ! 10.128.0.0/16 -p tcp \ --dport 0:1023 -j DROP iptables -A INPUT -i ppp0 -d $PPPIP -m state \ --state ESTABLISHED,RELATED -j ACCEPT |
25 Example: A firewall (cont.)
Everything is allowed on internal network
| iptables -A INPUT -s 10.128.0.0/16 \ -d 10.128.0.0/16 -j ACCEPT iptables -A OUTPUT -s 10.128.0.0/16 \ -d 10.128.0.0/16 -j ACCEPT |
26 Example: A firewall (cont.)
Forwarding....
| iptables -A FORWARD -i ppp0 -o eth0 -m state \ --state ESTABLISHED,RELATED -j ACCEPT iptables -A FORWARD -i eth0 -o ppp0 -j ACCEPT iptables -A FORWARD -j DROP |
Note that there is no forwarding in internal network
27 iptables script finale
- Make sure that the main chains end with DROP
- Zero counters
| iptables -A INPUT -j DROP iptables -A OUTPUT -j DROP iptables -A FORWARD -j DROP iptables -Z |
28 Summary
- It works really well
- It’s not difficult to set up if you know what you’re doing
29 References
- Linux IP Masquerade HOWTO (a version written in Jan 2003 is available)
- man iptables